

How I Repaired Electrical Blanket
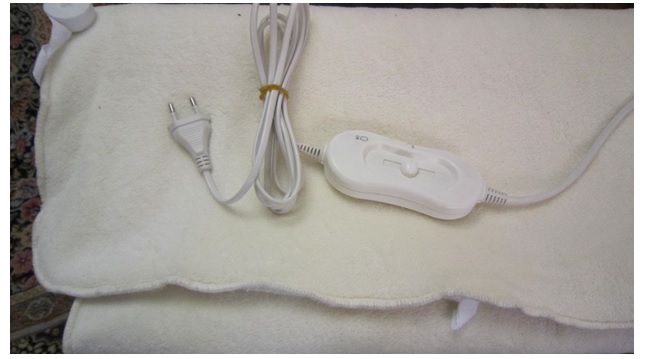
In the cold region of the world to have an electrical warm blanket is a must in any home. I received this German made very standard blanket for repair. I tried to turn on the blanket but blanket failed.
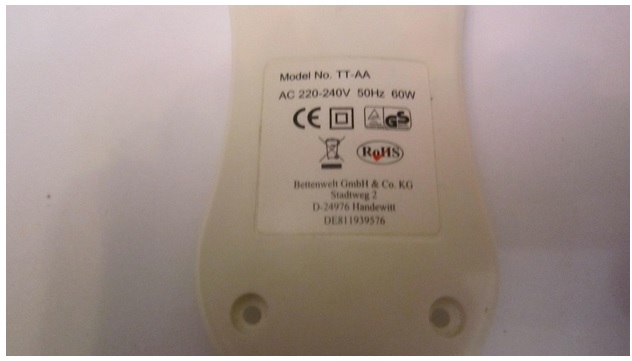
It has all standard safety logos on its label as well as ROHS that is about EU safety STANDARDS. Between the AC PLUG and the body of blanket there was a selector switch that 0ne can change the level of warmth by shifting the switch to three modes.
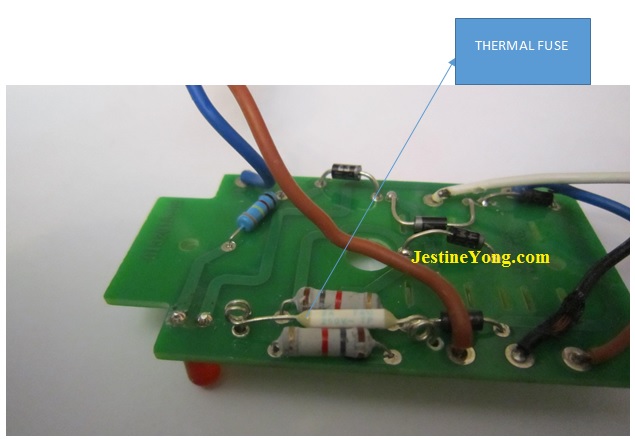
The machine did not show that the electricity is coming inside. I opened the control unit that was closed by four screws, inside there was not many components, three ½ watt resistors that were good and they were installed as a voltage limiter on the circuit. One thermo fuse and five diodes. specification of thermo fuse was 76 C, 2 Amp, 240volts. This means that if the temperature of blanket exceeding from 76 C and the fellow of current get more than 2 Amp the fuse will blow and with this action the blanket turns off and will save the blanket from getting to hot and fire and save the life of users. So to replace the exact thermo fuse with same specification was a must.
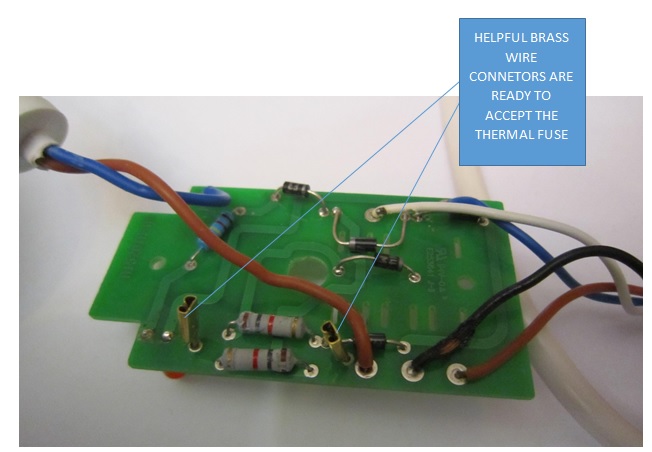
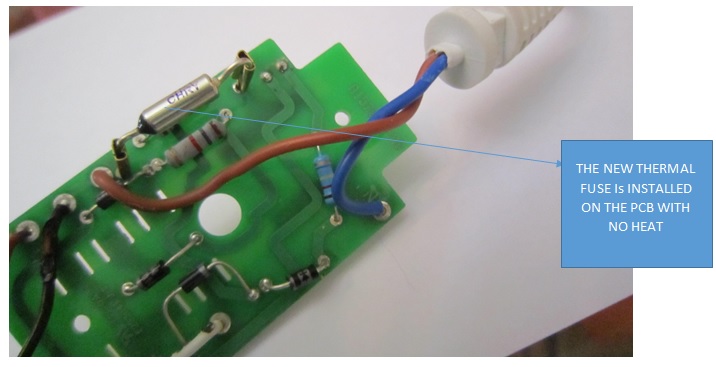
On the pcb one of the diodes was shorted, Of course for more safety I replaced all diodes, all them were 1N4007. I tried to find a thermo fuse with exact specification of original one and I found in the market. Up to here everything’s looks easy but the main challenge was started from this moment the main problem for replacing the thermal fuse was because the sensitivity of fuse to heat and this should not exceed more than 76 C but the tip of my solder iron degree was about 300 – 400 degre C this means if I get close the tip of my solder iron to fuse I will blow the fuse cos of excessive heat ! My lowest temperature solder iron was 20 watt that produce 120 C that also is much more than the 76 C. For your information the melting temperature of Stan itself is 231 C. Actually the manufacturer of this electrical blanket soldered this thermal fuse on the pcb by an unknown technique that is not clear for me so I decided to install the fuse on the board in directly.
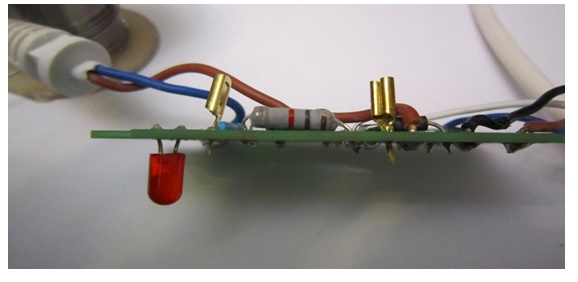
By the help of two wire brass connectors, I soldered wire connector on the pcb on the holes of fuse then I let it to cool down completely, then by pushing the wires of fresh thermal fuse in to the holes of the connector wire holder the fuse installed on the pcb without using the heat directly on that.
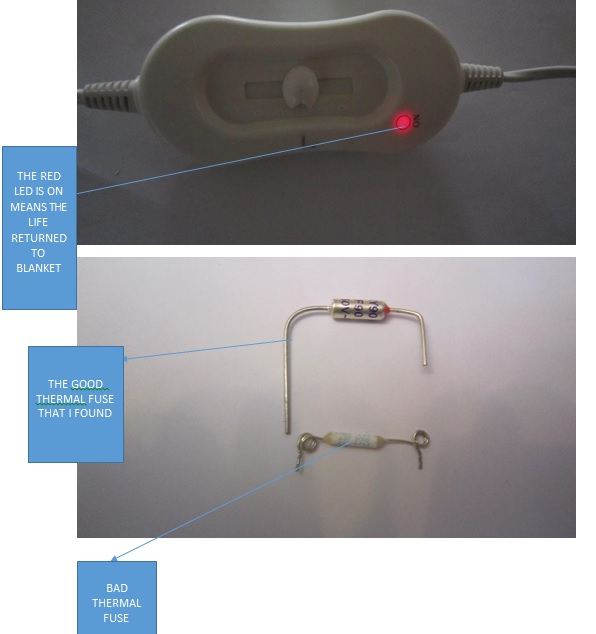
After installation of fuse the electrical blanket start to work and getting warm and 110 USD electrical blanket rescued from dump by cost of less than 1 USD and returned to its warm services again.
Conclusions:
The shorted diode of the controller switch was the main problem of the machine and was main caused of the blowing the fuse.
Note. Electrical blankets are very useful for thermo therapy of the human body.
Note: Newer electrical blankets are made with carbon fibers as heating elements that are working with the amounts of currents not voltages as a controller of the heat.

This article was prepared for you by Mr Beh from Iran
Please give a support by clicking on the social buttons below. Your feedback on the post is welcome. Please leave it in the comments.
P.S- If you enjoyed reading this, click here to subscribe to my blog (free subscription). That way, you’ll never miss a post. You can also forward this website link to your friends and colleagues-thanks!
Note: You may check out his previous repair articles in the below link:
Very good method employed by you to fix thermal fuse! Yes, indeed it’s very tricky to fix one. But you are a genius and found a way, and we learnt something new!
Thank you so much & you are welcome .
Glad to see that you were able to fix and rescue this electric blanket safely Beh! But I always wonder how these blankets are safe without the use of any safety transformer. I threw my old electric blanket away years ago after one of the internal wires almost caused my blanket getting on fire. Which was caused by a heat spot where the wiring kind of spot weldered on its bad internal connection in the blanket. Visible by a black burned spot on the blue blanket outside. (I guess that the material of the blanket is made of some fire resistant fibre to prevent worse from happening).
Yes recently manufacture are making the electric blanket with help of carbon fibers that they are sensitive to current not voltage in respect to control of heat of blankets.
good job on the repair. I do not see it very often that the thermal fuse actually soldered on board. I usually see it crimped to a wire attached to another part of the circuit but not to a board. very interesting
Crimping the wires is common method for such thermal fuse installation but for installation of fuse in this one manufacturer was soldered the fuse on the pcb board and that was strange to me .& you are most welcome .
Could also use freeze spray, a heat sink with low watt solder iron, or even an ice cube while soldering. Good teardown tho & great fix!
Excellent article, Beh. Thanks for sharing. It´s an article something different from the others. Indeed, a new look at maintenance works.
Henrique
to work on the tail of the brass connector was challenging because i should make it narrow to go to inside the holes of PCB of course by force of long nose and wire cutter this job is done.
thanks
beh
Good job Beh
Thanks JAI
Hi dear Beh thanks a lot for fix thermal fuse.
Use a Polyswitch (or similar) or a resettable fuse?
I have seen a guy on youtube use ice water to do it!
GARY
yes i know there is such technique. but still for me is a mystery how manufacture soldered this thermal fuse on the PCB .re settable fuse need more space for installation but i did not have such space in side the controller of blanket .
& thanks
beh
Gary
poly switches are not thermal sensitive .and do not have the standard of EU for such electrical blankets.
thanks
beh
Hi Dear Mahmoud
I am happy you found this article useful.
beh
Hi dear Beh,
I have the same blanket with the same problem, but I think my case is a bit different from yours in the sense that the circuit that came with my product is either badly designed or badly manufactured.
When I tried to fix the blanket, I noticed that the thermal fuse on the circuit had blown, so I bought a new one and replaced the old one, but when I turned the blanket on, the fuse tripped again. I had a look at both 1.8 k resistor that are in parallel, and noticed that one of them was almost burnt, and suspected that it was causing the thermal fuse to blow.
Then, I reverse engineered the circuit and simulated using PSpice, and checked that one of the resistor (precisely the one that was burnt) was consuming 5 watts of power, which is a lot more power than the power they can consume without destroying themselves.
So my question is, do you have the same problem with that resistor? If not, then my circuit is badly designed (or manufactured) and therefore I would like to ask you to send me the schematics of the circuit that came with your product so that I could rewire my circuit, if possible.
Very interesting post. Thank you
well …as far i know the fuse should be placed near the resistors and triggering /cutoff from external source….when the ressistors get hot, placing it on distance as you did is a changeover and the device is no more safe or at least not working as intended, You should be able to solder the fuse as long as you solder it quickly and only at the very end of the leads or use a heat shunt (a pair of metal clips on the lead)
Really good explanation. I have the exact same problem, I’m struggling to get the exact thermal fuse, where did you get your replacement from?
Can we use it without controller ??
Yes. But you take all the safety out then.
Very good fix there. The fuse must be next to the big resistors. If they get hot fuse blows…. Oh coil the fuse wires and solder fast
Thanks
That thermal fuse did not burn out for no reason. The heating cable must be damaged somewhere. This cable consists of two wires, external and internal, similar to a coaxial cable. When the cable overheats, a short circuit is made between these wires, the two resistors start to heat up and then the thermal fuse burns.
I had 3 blankets having exactly the same circuit but the switch is probably an older design. When the thermal-fuse was blown one by one I bought a bunch of replacement fuses. I noticed the blown fuse lead was wound up 2 to 3 turns. That’s probably how they solder it on without blowing it, maybe also with a heat shunt. Anyway, I wasn’t going to risk soldering the new one. So I simply cut the broken fuse near the body and leave the long wire on the board. Afterwards I straighten the wires. And simply twist wires of the new fuse and the old fuse. The twisting actually pull the new fuse snudge between the 2 resisters. Protect the 2 twisted pairs with heat shrink tubes but don’t heat shrink them. Bend the wires to prevent the tubes from coming off. Pretty sure this is safe as the fuse kept blowing from time to time these few years. I have done this until my stash of replacement fuses were used up.
Foarte bune informatii. De rezolvat faptul ca siguranta termica sa stea intre cele 2 rezistente care ii vor transmite caldura si sa declanseze intrruperea alimentarii conductorilor din patura. Eu ridic alta problema care nu am rezolvat-o. Am o perna electrica care are si 2 circuite Lm324 si CD4541.Defectul: Perna se incalzeste, in functie de pozitia comutatorului, insa cred ca dupa atingerea temperaturii setate, se decupleaza alimentarea, sceasta revenind numai la actionarea comutatorului la 0 si apoi la pozitia dorita. Sau se scoate pentru 3″ din priza. Cred ca nu este o functionare corecta. Am suspectat CD apoi LM apoi siguranta termica-le-am schimbat dar fara rezultat. Ce sa fac? Inclusiv tiristorul. Ce sa mai schimb?Care sa fie cauza?
Multumesc !
===========================================
Very good information. To solve the fact that the thermal safety should be between the 2 resistors that will transmit heat and trigger the interruption of the supply of conductors in the blanket. I’m raising another issue that I haven’t solved. I have an electric pillow that also has 2 circuits Lm324 and CD4541. Defect: The pillow heats up, depending on the position of the switch, but I think that after reaching the set temperature, the power is turned off, this only returning to the switch to 0 and then to the desired position . Or unplug it for 3. I don’t think it’s working properly. I suspected CD then LM then thermal fuse I changed them but to no avail. What to do? Including thyristor. What else to change, what is the cause?
Thanks !
When soldering the thermal fuse you “coil” the leader wires so it does. It overheat. See the image of the old blown one.
Warning:
By moving the thermal fuse higher above the 2 resistors, you have removed the thermal protection.
The thermal fuse is supposed to be in close contact with the resistors so it can trip out if they get above 76 degrees.
Exactly !! Bad mounting,,,
In my experience and opinion, this sort of thermal protection does not measure the temperature of the blanket,but blows the thermal fuse after a certain time depending on the temperature of the resistors. So,in my opinion, this sort of protection is virtually useless! In my case the resistors became faulty, causing the controller to become very hot and of course blowing the thermal protection.I removed the resistors and soldered a wire across the thermal protection. The blanket now works fine.
This is very dangerous! The fuse has to be exactly the same. E.g. The new one is bigger so it has a bigger thermal mass and can burn slower… Also the fuse MUST TOUCH THE RESISTORS !!! It can’t just hang there in the air above the resistors. That’s like having no fuse…
Does it matter which way the new thermal fuse is fitted? In other words is there a positive and negative side to the fuse?
Where do you buy new fuses?
You might as well have just soldered a simple wire between the points.
you have removed the thermal protection by moving the thermal fuse away from the resistors that are used as the heat source that trips the thermal fuse.
the resistors are also metal shelled. so you cannot use a metal case thermal fuse next to them.
from what I found I’m pretty sure you also used a 10a thermal fuse so even if there was any protection from the fuse blowing from the current being too high that’s also been removed.
The heating wire has two strands of wire,the heating element and an insulated safety screen around it, which connects to the two parallel resistors against the thermal fuse covered with thermal paste.In the event of the heating wire getting damaged and the insulation between heating element and the screen wire come in contact with one another, the two parallel resistors heat up and blow the fuse, disconnecting the mains supply. If the fuse is replaced and doesn’t immediately blow, it indicates an intermittent short.